 An Off Road Power COMPACT Wheelchair with a difference.
MK2 version
Part
1
Strip & modify
Mk2
1
| 2
|
3
Mk1 |
Mk2 |
Mk3 versions +
Timeline
A completely re-designed & better
built powerchair, that is at home walking the dog in the woods in winter as it is
in my Van or my Home.
For
around �1500 to �1700 UK Pounds...
3 pages.
The
Original
ultimate powerchair project should be read first. Much of the reasoning and method behind everything is on that page (actually 6)
and was completed last month.
Detailed PowerChair Only Menu
|
|
 How
it looks so far! This off
road electric powerchair is an ongoing documented almost daily build...
Finished
>>> How
it looks so far! This off
road electric powerchair is an ongoing documented almost daily build...
Finished
>>>
A narrow 25.25 inches
(640mm)
wide at the widest point with 18 inch cushion and
40 inches
(1000mm)
long including the deep footplate.
And seat height variable from 16 inches high! Currently 18
cushion. That's smaller than many manual powerchairs. And almost all power
wheelchairs. And it is all day, very manoeuvrable with no "corners" (casters or
swing away footrests) at the rear And it uses full size group 24 75ah batteries
and 6mph!
I would just buy an off road power wheelchair
but build quality, finish and size
issues
means you simply can't. So as usual I will just do
it myself.
Powerchair off road
(Under construction)
Because I want an off road chair that I can use all day every
day for everything from walking the dog in the woods to driving my van to going
to the pub. And no such chair exists. They are all too big.
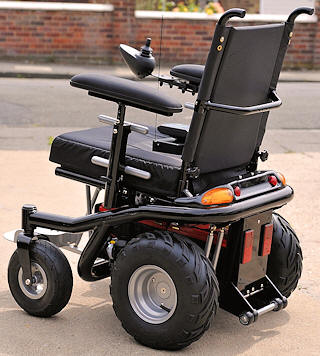
Even the almost
correct Frontier X5 here is a
fraction too wide and has a few other problems for my use.
This
new page details the quite involved modifications
That allows big fat balloon
"off road" tyres and wheels to be fitted in addition to all the other
modifications on my other two daily powerchairs
here
|
Reason?
Well they look cool! And because they are balloon type tyres with big fat
sidewalls the ride on our pavements is much nicer! My spine no longer
suffers. They also don't mind
mud and grass or sand.
I walk my German Shepherd dog about 5 to 7 miles a day. On grass, forest
paths and in the winter. These tyres are opposite to the "Stiletto heel" or a
normal powerchair.
They don't damage surfaces as much
either. But the don't sink in soft ground! And they grip! And they are tubeless
with the multitude of advantages that gives including much better puncture
resistance. And 4 ply construction... (see previous MK1 page!)
This is a
completely new powerchair build, still using an ancient old donor powerchair
(another Sunrise F55s) although much less detail will be shown regarding much of
the build since that's already been done previously
here.
You should read this first. Most of the bits that are different will be covered
in detail should you be daft enough to want to do this yourself.
The other chair was just a simple bedroom build job. This
one needs a bit more fabrication although still massively cheaper than a brand
new inferior powered wheelchair.
|
|
The next incarnation has just
started now that I have several suitable, usable, powerchairs built & ready to
go. With that in mind...
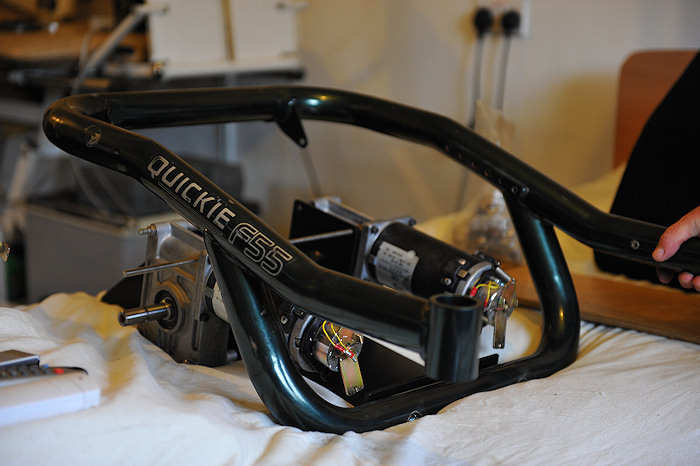
05
- Feb 09
The new "version" I am now building has just
begun. I have one (very old and abused F55s powerchair) in the garage
right now already stripped down to its basics. Took 35 mins. It is a very very
old and worn out affair -- much like the two on the first build...
It wont
matter because I am only using a few of the original parts like the main frame
and arms. I am only using those because here in my bedroom I cant fabricate
better ones!
Manufactured powerchairs really are horribly designed and
made although the F55s Sunrise Medical one is the best designed of them all in
my own opinion. Although that can be drastically improved!
here The arms in particular are
over complex and wear out every few months.
Given the opportunity to start from
scratch with a proper workshop it would be easier to do just that. But I have
non! I work under very limited conditions.
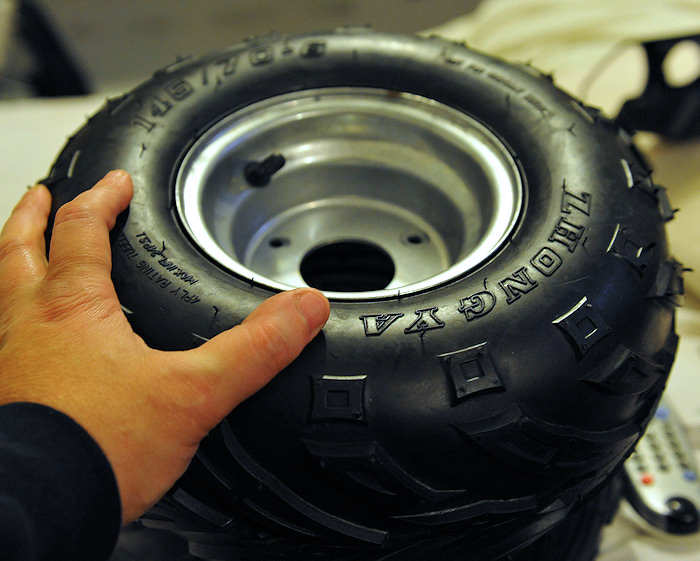
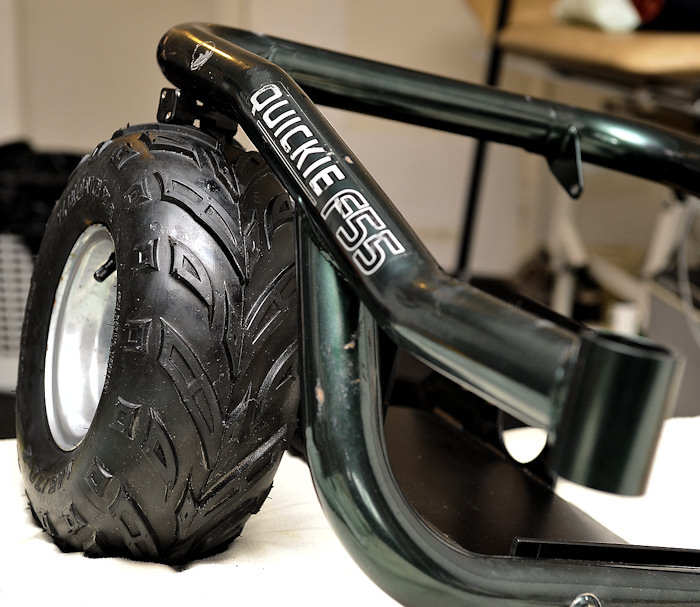
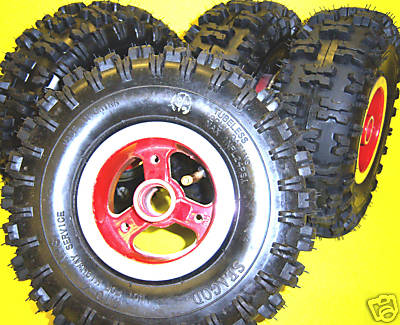
Here is a wider smaller wheel below with a bigger
fatter tyre fitted. It came from eBay cheap, along with most of my
powerchair stuff. Along with (five others) for a
miserable 5 British Pounds each. They come from cheap small kids Quad Bikes. But
again with 4 ply tubeless tyres, which are very cheap and easily available. The
overall diameter is about the same as a stock F55 is at 14.5 inches. The sidewall is huge
though.
Many different tyre tread patterns are available in
this 145/70 6 tyre size. Overall diameter is about the same as the
original wheelchair wheel/tyres. The advantage is in those huge soft sidewall.
|
Think "Smooth ride" even when driving over the edge of a curb or pot holes that
pass for our pavements. They deform over obstacles. They can run slowly over a 2
inch square block of wood and the rubber just absorbs it and the powerchair
hardly rises.
Its because they are balloon tyres with only 4psi pressure. Our pavements are almost as bad as these off road tyres
were actually designed for. I will probably use almost slick like tyres but in
this same "fat" balloon size in the end. They will ride smoothly over lumps and
bumps, Giving my poor spine a softer smoother ride all the time. These
should be standard on all powerchairs...
Any idiot can bolt a set of these
to a any wheelchair! But of course that just leaves the powerchair far too wide for
daily normal use. So its easy but pointless. The hard part is making them fit without making your
powerchair wider. Every inch REALLY matters. I need to use it in my van and my house. The wheel size is also available in polished alloy if that
sort of thing appeals. I would rather just have half a dozen very cheap steel
(but will be powder coated) wheels and tyres kicking about as easy swap spares.
Fat off road wheelchair
tyres medium
|
Fat off road wheelchair tyres
large
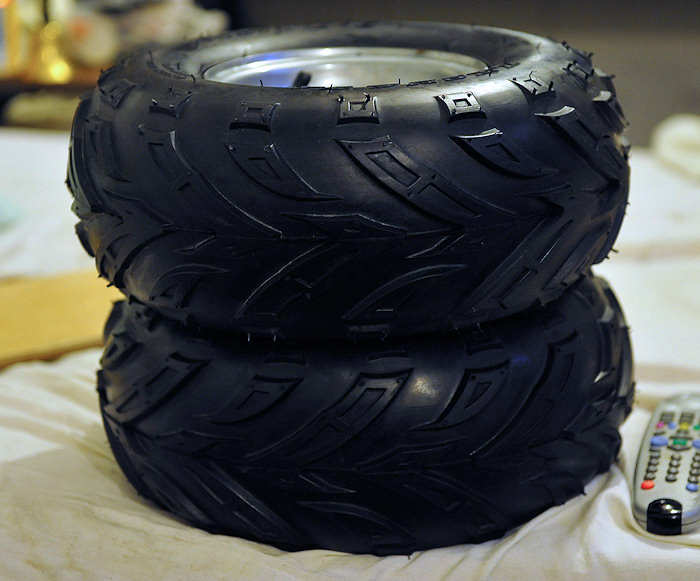
It will have big fat off road quad bike
tyres on the rear. These are cheap used eBay ones. Thing is I can fit these now should I wish
to this MK1 powerchair and I
have tried them as the hubs I made to take the trailer wheels, are drilled to
take these 3 bolt wheels as well. Just add some longer spacers and away you go! But that's useless as the powerchair finishes up wider. That's bad. Its the sort
of thing "manufacturers" or industry insiders do since they just don't
get it....
There is absolutely no point making the total width
greater since it makes the chair less usable on a daily basis - the exact opposite to what's
actually needed. So that means a big problem then! And much work...
I want to be in this thing in my van,
in the house, in the pub all day every day. I wont put up with any extra total
width! Or smaller batteries. Any moron can just fit some big wheels and do
that, but I want a daily all day powerchair for indoors and out.
So I have to do some serious modifications and somehow manage to fit full size
motors/batteries as well as 12 inches of rubber into
25.25 inches
(640mm)! Not easy.
wide powerchair tyres medium
|
wide powerchair tyres
large
But that means that the batteries
either need to be smaller as the motors will need to be moved in by 2.25+ inches
each side so the tyres don't hit them, in order to keep it narrow. So
I am probably going to use much more efficient and better lithium iron, or
lithium polymer (or safer Lithium Phosphate) batteries in this newest incarnation. If I can find a
volunteer / sponsor... They have around 10 times the energy density weight
for weight so can be much smaller and lighter. Trouble is they are also ten
times the price.
(As of April 09 no sponsor found so have to somehow get 2x 75 amp hour lead acid batteries in there!)
Lithium's could easily give better range as well as more performance
from a smaller and lighter package. Although really expensive. It will give a
smoother ride on those balloon type tubeless tyres too so no suspension will be
needed. And so yet more weight saving. And it will not sink in soft ground or
sand as easily. So to keep the same or in fact much better level of range and
performance the batteries can be much lighter but that's no problem with
lithium's other than cost.
They are better at high discharge currents than equivalent sized
lead based batteries, have greater cycle life and also don't spill and stay
charged for long periods. They can also be fast charged. But charge them
incorrectly and they can explode or catch fire violently. Fortunately there are
safe solutions out there that can be used already packaged. Help, sponsors!
While I am at it I would like to go up to 36 or 48volts or above
for a 50 to 70 percent speed gain and use a bigger amp
roboteq controller since the wheelchair industry still insist on
using inefficient old 24v 100 amp controllers and heavy old lead acid
batteries... (If I cant organise that at a sensible price I will see if
for now I can find a way to get a pair of 70ah deep cycle batteries in there...)
And I may have to do.
so unless a sponsor volunteers their services! (Which is what happened...)
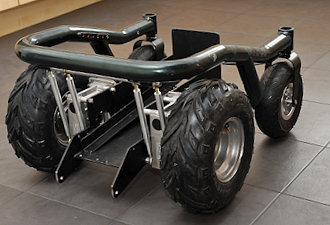
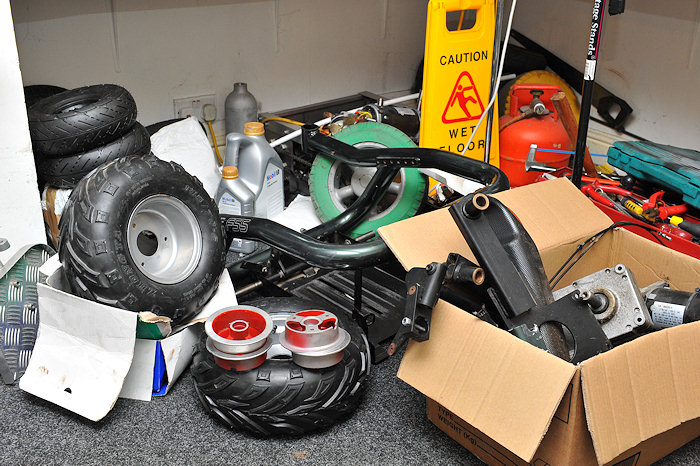
And with that in mind I have just
stripped powerchair no. 3 down to its very basic parts... Here is some of
it..
This one was donated free by a reader
(Thanks!)
but if you fancy a project most used powerchairs sell for only a few hundred on eBay.
It looked quite good when it arrived! 35 mins later it looks like this. Sadly
wrecked.
And it has already been cannibalised for parts for the
previous
powerchair build. Its now going to be rebuilt properly with narrowed battery
tray, (to allow me to fit the wheels/motors inboard) off road balloon tyres, as
well as all the other mods shown in the other
modified powerchair pages. I may even get away without having
to go to lithium batteries (and their stupid cost) just yet if I can turn one of
the batteries around and redesign the battery tray in order to get enough space
for those wheels/tyres -- one things for sure,
I will keep the total tyre width to the same size as it is now.
25.25 inches. Wider is easy. I could just fit the
wheels but then its too cumbersome and wide for the house and my van. Notice the
bigger wheels and tyres in that pile.. They are 6 inches wide each. That's 12
inches of rubber! Doesn't leave much room for batteries and motors. My head is
starting to hurt. Now you know why they are not seen on any other nice narrow
powerchair other than the Frontier X5 Mid drive one
and that's too wide. After this they will appear
probably!
Doesn't look very hopeful here does it? Trust me it soon will!
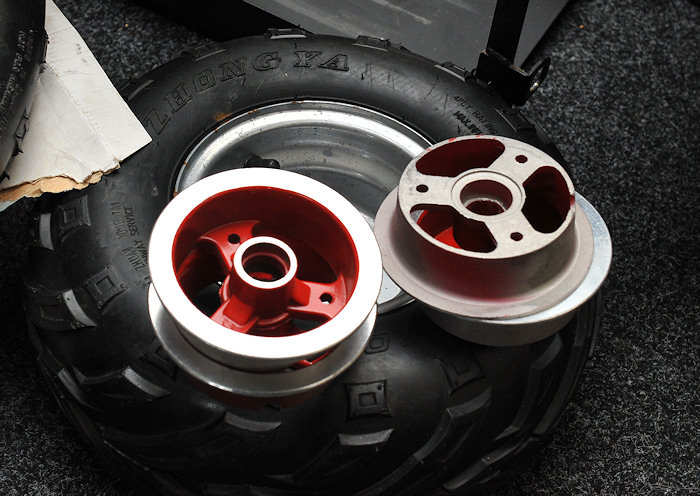
I plan on using these eBay wheels for the front because they
were (a) cheap! (b) prettier than the stock ones (c) lighter. They will also
look brand new once blasted and powder coated. They are from a kids quad 50cc
"minibike". (eBay of course!)
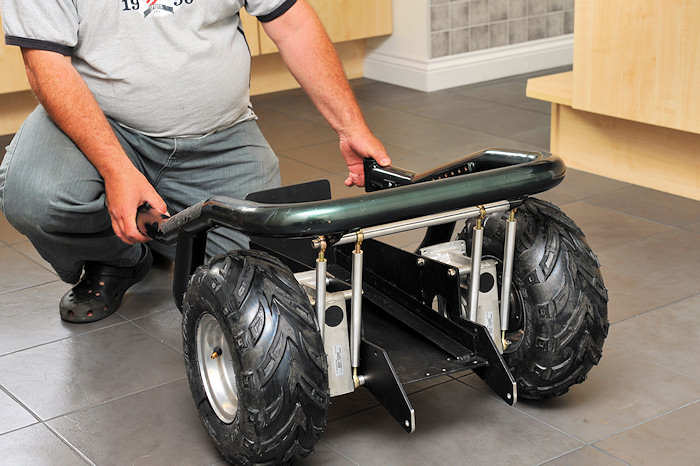
This is how wide and complicated the
original battery tray and rear swinging arm suspension used to be on a stock
powerchair. This image is stolen from
part 1 page. The space where the battery goes is about 4.5 inches wider
than the new simplified one. And we don't need springs as the big balloon type
tyres do a much better job.
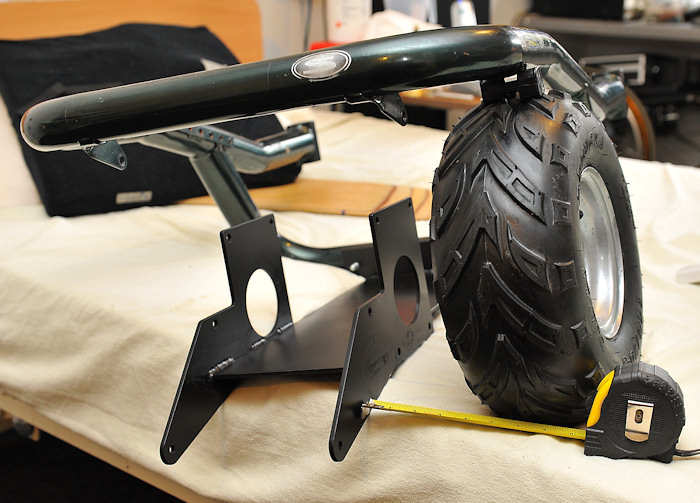
working out the width medium
|
working out the width
large
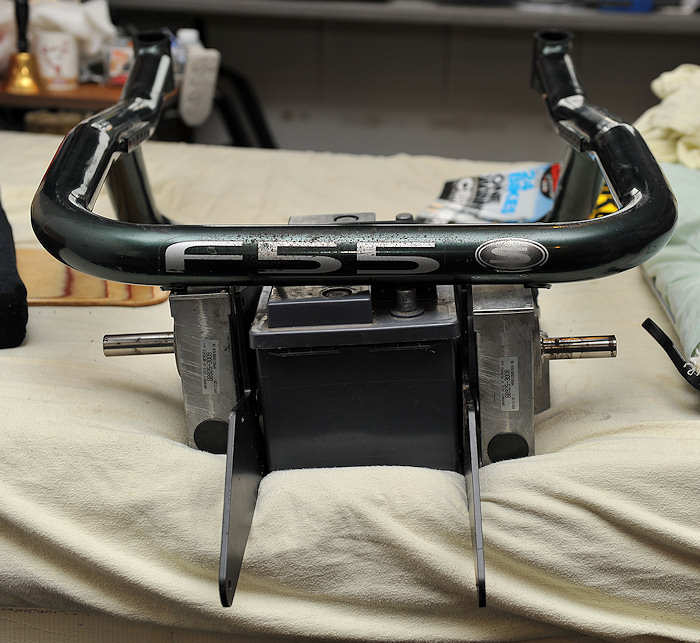
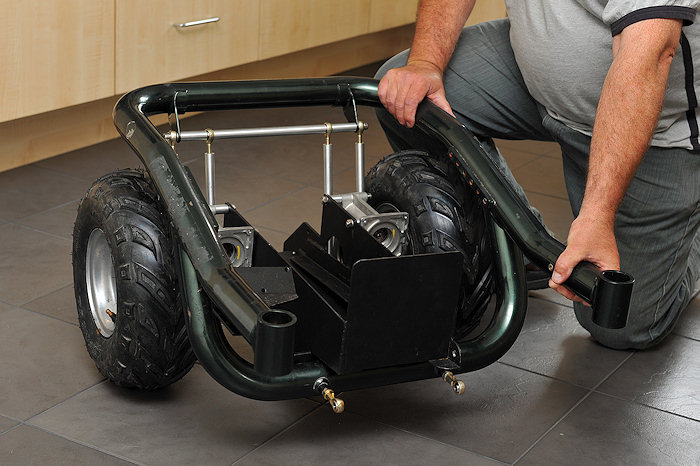
Heres the new "project" Wheelchair. A
quick look with the ruler shows me that space for those huge 145mm wide tyres is
a big problem. Here the battery is turned through 90 degrees. Making
it over 4 inches narrower overall from motor to motor... Me I have a
hacksaw and a brain. I knew this would be all but impossible without very
expensive lithium (or Ni-Cad or Nickel Metal Hydride) but they are stupidly
expensive at the moment (AWAITING SPONSORS!???) and I am not made of money!
So if its remotely possible to fit those wide tyres while still
keeping the stock wheelchair overall track / width the same and also keeping the
same range and 70ah stock battery capacity I will do it... If not I will
need to spend lots of cash. My ruler and a long look at battery capacity/size
and availability of the stock type lead based batteries tells me that it CAN
just about be done. I need to keep total width to 25.25 inches max. Or 640mm -- wider isn't going
to happen Who needs a wider powerchair!
If I turn the
batteries sideways (long-ways) on then that reduces the battery width by some 4
inches. 275 mm (280 clearance) wide is now 175 (180) or 4 inches if you are
analogue... So we now have the following items to get in at the rear::
140mm (left tyre) -- 90mm
(left motor) --
180mm (single battery width) -- 90mm (right motor) -- 140mm
(right tyre)
Allow an extra couple mm for tyre clearance and the total width
"could" be just 640mm! So I am building a
new battery tray today. Now that the batteries are turned long ways around this
tray will only need to be 180mm wide.
But the batteries total length back to front in the chair is now
a lot longer. At least if I am to get the same group 24 sized batteries in. So
the batteries will have to sit at a 5 degree angle rising towards the front and
slide in from the rear on two bits of 25 mm angle iron welded to the insides of
the new battery tray... They will need to be higher at the front to miss
the 50mm frame rail as they will sit above it now at the front edge.
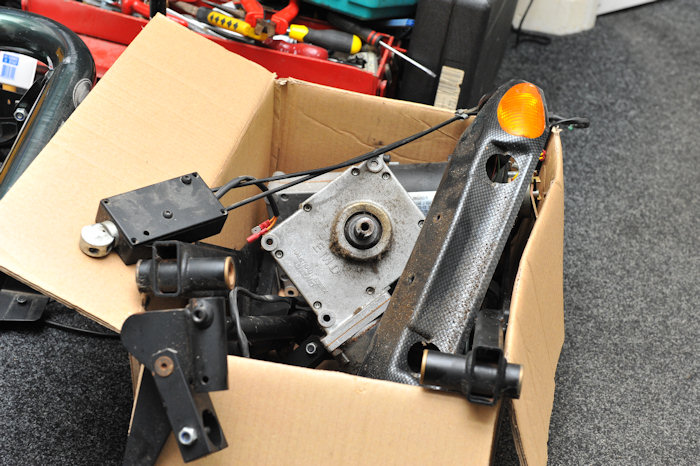
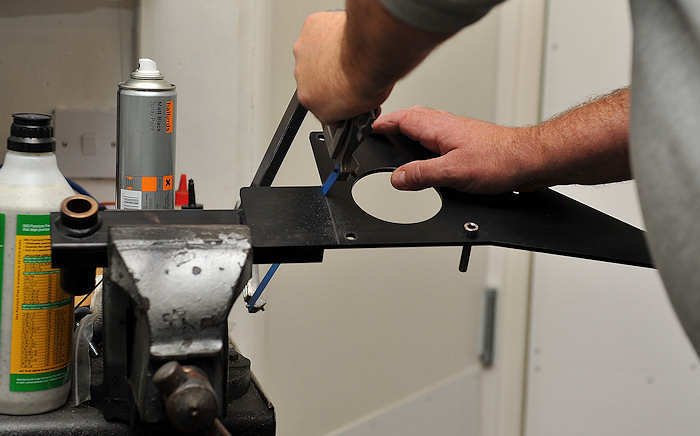
They (batteries) will come about 4 inches past the front frame
rail. So with that in mind and because I am working with no budget and from my
bedroom (!) I cant be bothered to make new motor mounts. I will simply cut the
old ones off the now unused rear swinging arms. Below.
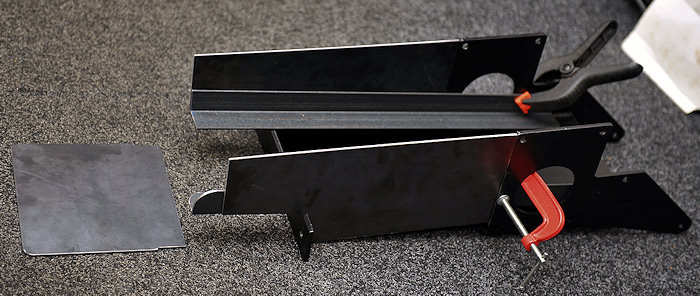
cutting wheelchair parts medium
|
cutting
wheelchair parts
large
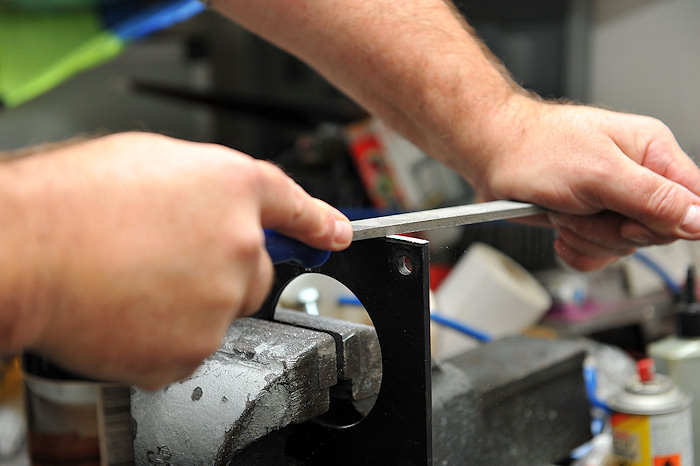
This is long suffering Brian. He is sweating doing this. And
then he has to file it...
file medium
|
file
large
If you look closely (large image) you can see the filings coming
off to prove he was actually working...
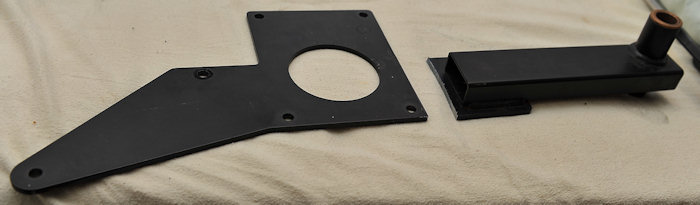
The net result is a ready made motor mounting (the left half!)
complete with anti tip extension ready to weld to my new home designed narrower
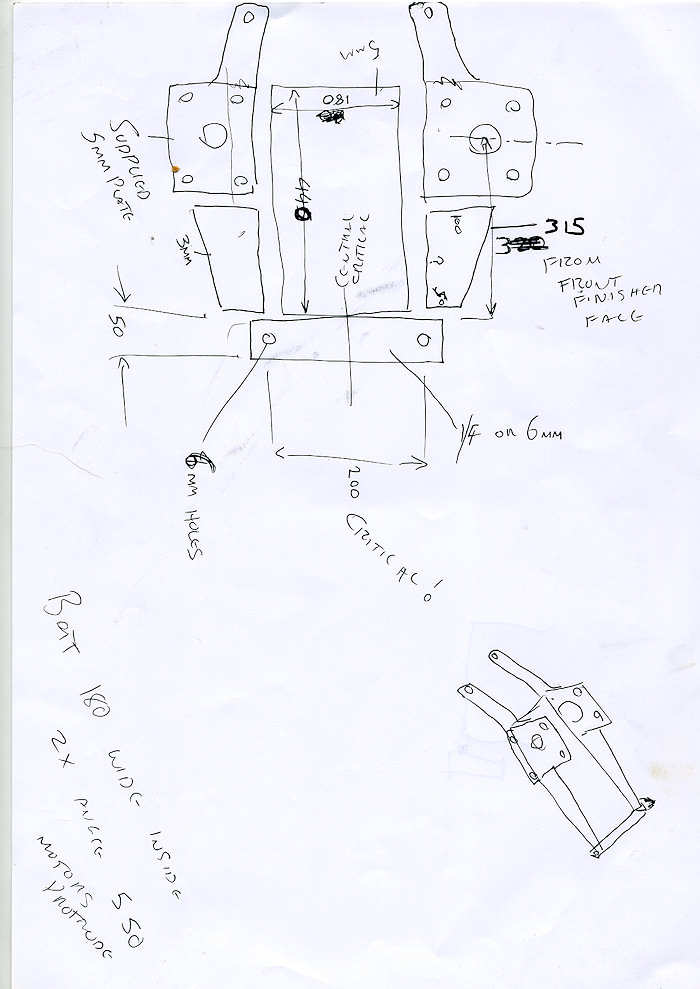
battery tray. We obviously did 2 of these... As you will see from the
marvellous engineering drawing done in the pub last night that is the new
battery tray.
So I ordered some steel.
I
would do all of this in Aluminium Alloy but I cant weld that myself. So it needs
to be steel. If I was a real manufacturer I would build the frame, the battery
tray and most of the rest from light alloys too but I am not and they don't
because nobody cares or understands and powerchairs don't seem to evolve in decades.:
1 off -- 440 x 180 x 5 (or 3/16 inch)
plate (It has to be this heavy because it will also have my wheelchair clamp
fixing welded to the bottom...
1 off -- 50 x 240 x 6 (or 1/4 inch) plate
2 off -- 550 x 25mm x 25mm angle strip
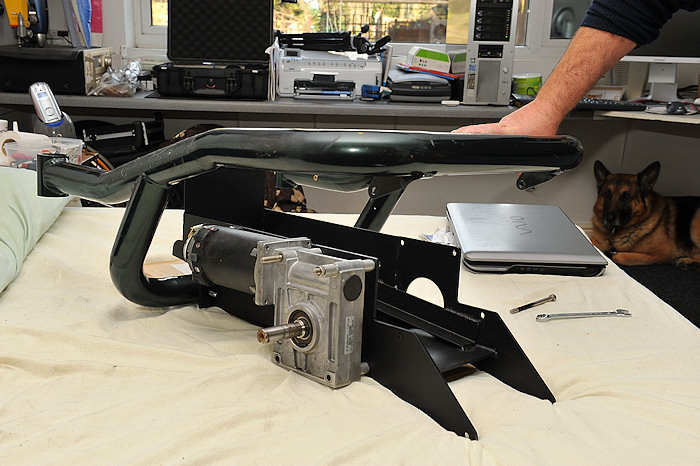
And did this...
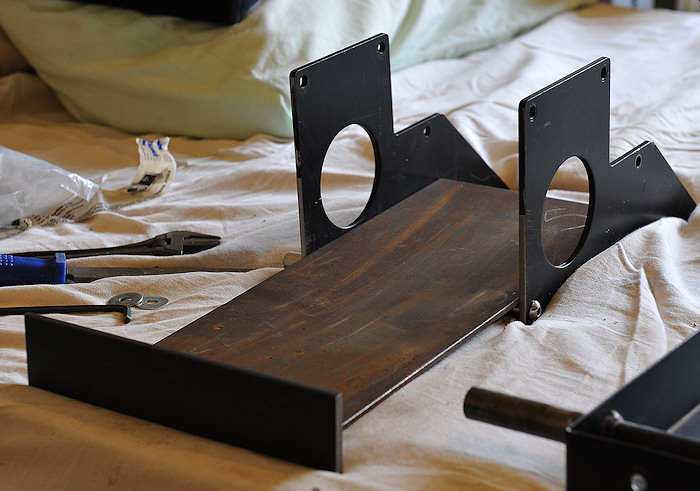
All just leaned together above. Needs welding. The new battery
tray will also be the motor mounting and the rear suspension will be gone!
No rear swinging arms or shock absorbers! They waste space and are heavy. The
new balloon style tyres will give a much better ride anyway. Big soggy
sidewalls. And they are cooler looking and less puncture prone compared to tyres
with tubes... However if you prefer grey tyres on your powerchair you may want
to give this mod a miss! They don't make tubeless 4 ply off road 4x4 tyres in
grey. It will be clearer once construction starts!
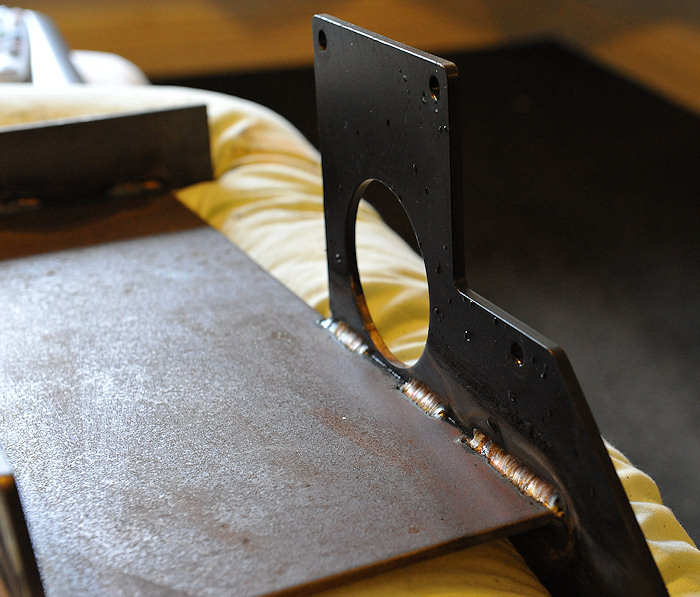
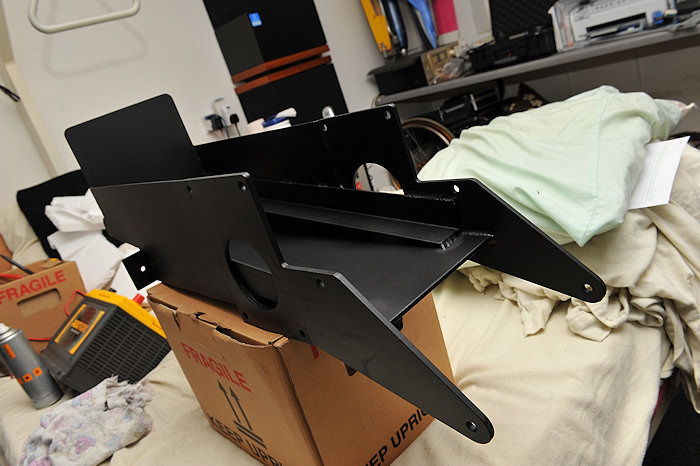
Now welded... Living a few hundred metres from a technical
college is very useful, they have lots of metal, and TIG welders... And guys
that know how to use them. My welding is crap. This cost me a beer.
The bottom. Once finished (more parts to add and weld on) it
will go to be shot blasted and powder coated and will look better than a bought
part ever can. This will then allow me to fit those wider off road tyres.
It allows the motors to sit two inches (50mm) closer in, Giving a total four
inch narrower rear end. Making room for the wider rubber without making the
chair wider because that would be the easy but stupid way out. Who needs a wider
powerchair.. I want mine as narrow and as short as possible since I have
to use it in the real world which seldom makes room for bulky powerchairs. Shame
the manufacturers don't seem to realise this.
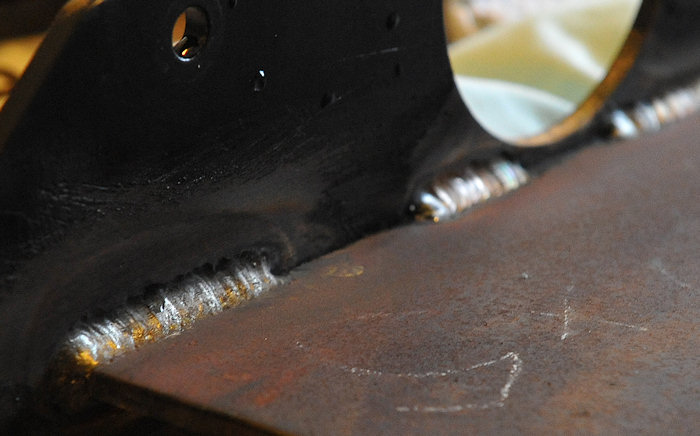
This welding lark took about 5 mins but jigging it up accurately
took me about 15 mins. Best to only weld it the once!
This of course means the batteries either have to be smaller
(NO! That's what a manufacturer would most likely do! I don't do compromises) or they have to be fitted in the
other way around. And its a real problem. Space is at a bit of a premium here!
Now since I didn't design the frame I have to work around it. The battery tray
will have two rails that allow the batteries to be loaded from the rear and
slide up inside at a small angle over the front of the existing frame rail. Its
easier to wait for a photo in a few days...
Much more to come about this latest build when I have some more
images and info to add hopefully..
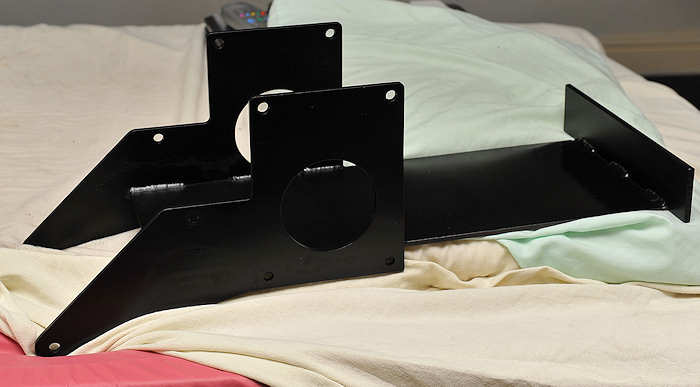
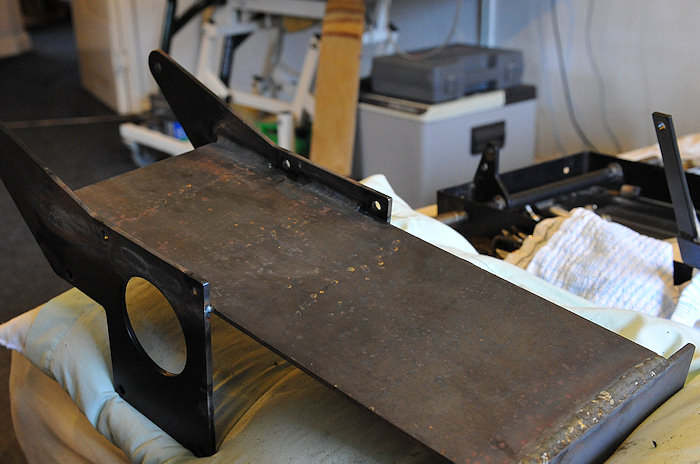
With a thin coat of matt black paint
(so I can work clean and I
can mark the metal for drilling etc) it looks a bit tidier! The motors now bolt
straight to this battery tray. with some 25mm alloy spacers. The gearboxes are
thinner than the 90mm across motors. That leaves a space of 180 mm for the
batteries. Since the batteries are not quite this wide it leaves JUST enough
room for some domed headed Allen bolts (polished stainless steel of course!) to
hold the motors on. This sort of thing is dead easy if you are working for a
wheelchair manufacturer but damned hard work if you are working in a bedroom! As
is scrounging metal and welding time at the local college that I don't even go
to.
I would DEFINITELY do this in light alloy (Aluminium) if I had a
proper workshop. And the main frame. Its hugely lighter and doesn't rust... So
why don't the "real" manufacturers do things properly? Either they cant or just
don't get it or the bean counters wont let them. Or they don't care and think we
don't know the difference. Well they are wrong.
Bigger size
|
Really big image!
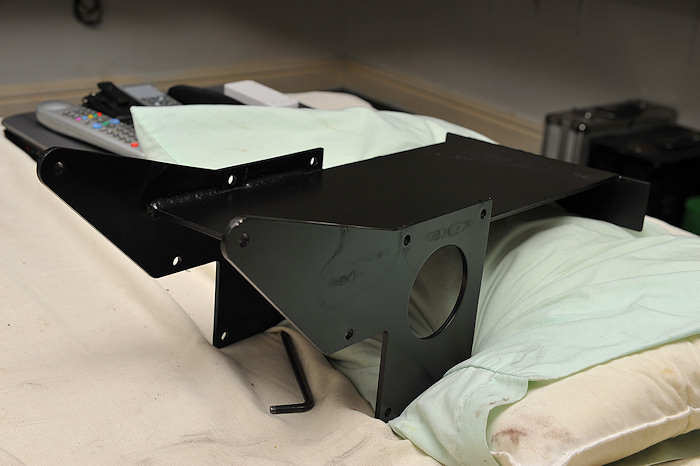
So here is an unfinished battery tray. Awaiting some 25mm (1 inch) angle so I
can continue. This is the bottom. The wheels and tyres are about 20mm smaller
overall than the 3.50 x 8 ones on the other two chairs so I mounted the motor
plates a little lower down, hence the bolt holes being accessible from the
bottom. This will mean that the actual powerchair frame is exactly the same
height as the other two powerchairs here. It
has to be the same as it also has to fit my vans wheelchair tie down. Just like
the other two.
check assembly medium
|
check assembly
large
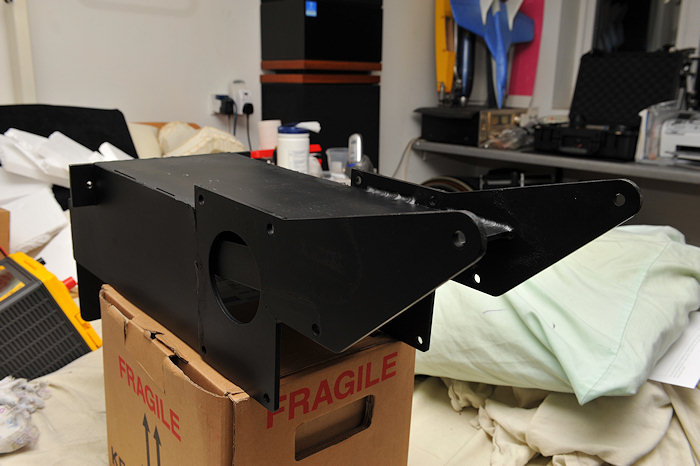
Well after drilling and tapping the two holes at the front so I can try it
bolted in place and after attaching two old motors temporarily we get a figure
of 364 mm wide between the outsides of the motor cases. This is the bit that the
new tyres have to miss. So if we add the 2 x 145 mm tyre widths we get a total
rear width of 654mm, Realistically we need about 5mm of clearance between the
rear tyres and the motor casings so that will be a total rear width of 664 mm
when completely finished. That's 26.1 inches! That's less than it is now... And
less than my manual wheelchair. So we can still get 70ah batteries, as well as
145mm wide tyres in there without needing to make the completed chair any wider
of have any less range.
4x4 powerchair assembly medium
|
4x4 powerchair
assembly large
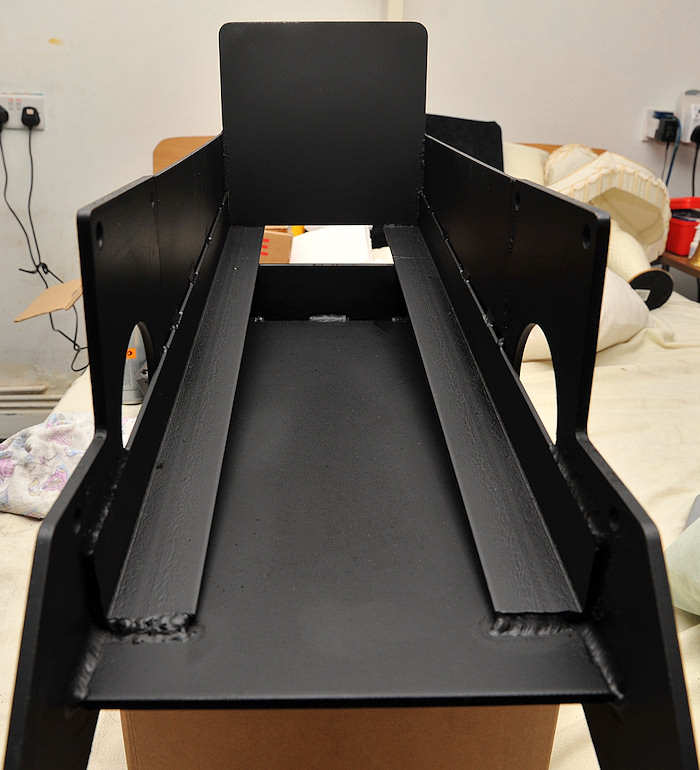
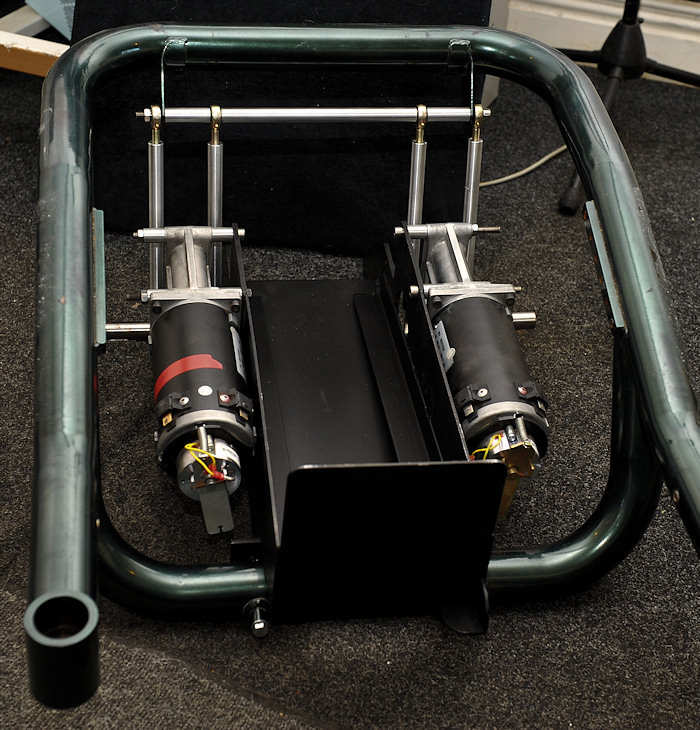
A view from the front. The motors are very "inboard" now and the batteries fit
long ways around and will slide in from the rear on two angle iron strips welded
to the battery tray to give more strength and also to give me a mounting point
for the seat front. You will need to wait and see! Today I am busy doing normal
stuff...
JCB style powerchair medium |
JCB style powerchair
large
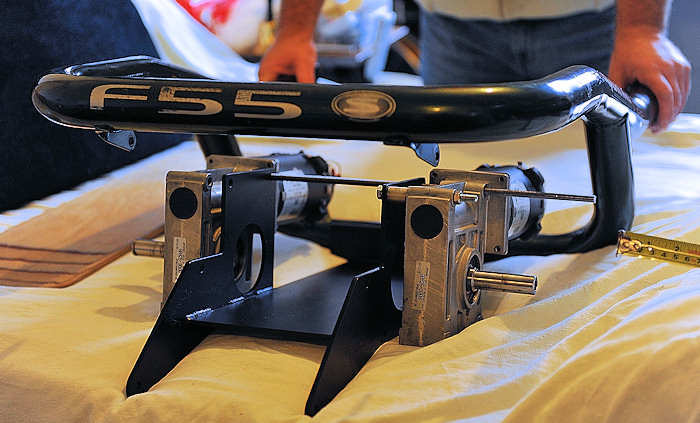
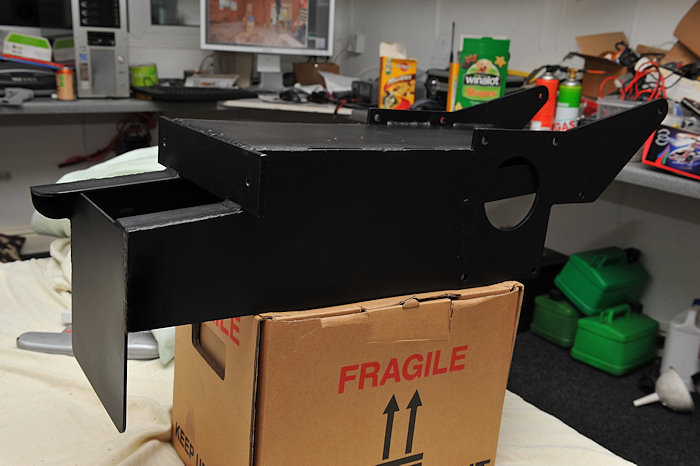
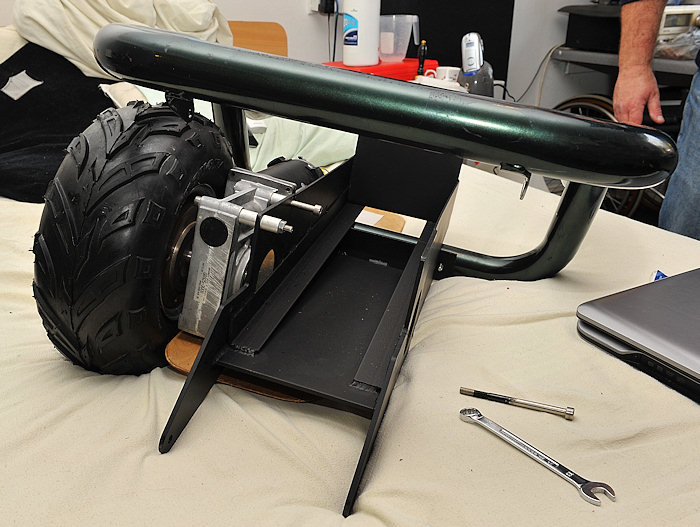
Why am I doing this? Because it will look
cool! And it will go off road, and look at that big sidewall! It will give me a
smooth ride. I just propped it in place so I can see how it will look. Its
almost in the right place here.
measuring overall width medium
|
measuring overall width
large
Its in exactly the correct place here. With
the new narrow battery tray, inboard motors, and everything the total overall
tyre track or width is actually less than a standard Sunrise F55s Power
Wheelchair.
You have to ask, if they look so cool, ride better on those
soft low pressure balloon tyres (which are tubeless and don't puncture anything
like as easily as tubes do), save weight (no swinging arms or rear suspension
units) use less parts easier to clean and are more easily swappable in the event of a problem then why don't
the manufacturers do it this way? Then I wouldn't have too...
They all seem to be stuck in the dark ages. Pride in particular seem hell bent
on persuading us that mid wheel drive chairs are a good idea! (other than for
marketing).
Where is the corrosion free carbon monocoque one piece autoclaved ultra light frame, battery housing and motor mount
with seat? Where are the 200 amp per channel higher voltage and higher
efficiency controllers and fast charging lighter lithium battery power with
brushless motors that I already use with my model helicopters and aircraft?
Its
expensive but I don't care, its my legs. What are yours worth? Its
all available and all easily possible. And it won't get cheaper unless people
use it! But sadly we all still have iron powerchairs
with steel / iron railway engine construction and tubed tyres with lead
batteries. I find it all very sad. I could do massively better with a small budget
here in my bedroom!
All of the small changes detailed on the previous
powerchair modifications page make a huge improvement to the chairs day
to day usability. Even the decent batteries and
1 hour charge capability frees
me to go out in the evening in complete confidence. This current wheel and tyre mod makes it better again. If I can do
this stuff in a bedroom then what's their excuse? Right Got to go! I am fed up
with scrounging TIG (Tungsten Inert Gas) welders and getting others to do the
welding so I am ordering a cheap TIG welder online. Tools are so cheap now. (less than �300 for 150 amp
TIG with
Gas ready to go. And another 80 for a decent mask that goes dark automatically) And the Angle Iron that I was waiting for just turned up!
Along with some more pre cut 3mm sheet steel. Work to do.
OK -- now after about 30 mins with an Olde
hacksaw we have the angle iron strips cut to length, (one longer than the other
since it has to provide a seat support mounting and is yet to be drilled) and
two sides.
Oh and the front plate laid on the floor. I took it to the local
college to scrounge a little more welding time (mines not here yet) and would
you believe they are missing again! Do teachers ever go to work? Half term.
So I am temporarily stuck until either they go back to work or my new TIG welder
turns up.
Well at lest you can see what the plan is. The batteries slide
up those two angle strips, over the front chassis rail. Once its all been
welded and bolted in place and tested for battery fit, motor fit, frame fit etc
etc it will be shipped off to the powder coaters. It should really be
built from aluminium with super neat welds and mirror polished - as should the
main frame. But I don't have the equipment here.
Again if the manufacturers built a proper lightweight
alloy powerchair I wouldn't need to anyway would I? Of course
loads of so called industry experts will tell you its not practical, too
expensive, has all kinds of safety or structural issues yada yada yada but
that's just crap. It stems from little competition and large profit margins and
easily satisfied customers. How do I know? Because that's just what the Japanese
bike companies said in the 60s 70s and 80s. Guess what they build now? Yep
lightweight alloy chassied short sharp road rockets with fat tyres and decent
suspension tons of horsepower and decent brakes... I could have told them
that in the 70s.

That's why all
sports bikes come with light alloy frames that are stiffer too. Steel frames are
now thought of as bad handling overweight dinosaurs. As below. In the eighties
the only alloy frames were built by individuals and specialist companies like
Spondon Engineering in Derby. That's why in the 70s and eighties bikes
didn't handle well and the frame was so heavy it was hard to carry. Now
they can be carried with one hand easily. On a powerchair there are MANY steel
heavy badly designed parts that should be alloy or better still carbon fibre or
simply designed out altogether.
But I
digress...
Back to
work..
narrowed f55 battery tray medium
|
narrowed f55 battery tray
large
Now its all welded together and given a quick spray can matt black paint finish
so its clean to work with. Can you see how it works? If I had a proper
workshop like the manufacturers have rather than a bedroom this would be a
simpler design and be aluminium. It would be stronger and lighter and would be
prettier and anodised black or silver. No need for paint or corrosion!
So why
don't they build like I want or would do? Options: (a) They don't know how. (b)
They don't understand the need or the advantages. (c) been counters --
cost, unlikely as I don't see why a lighter simpler design costs more. (d)
easy life, lack of competition? Maybe... (e) they think we don't know the
difference... Paint it a jazzy colour, they will think its great! I
like black as it happens.
The batteries slide long ways up this chute from the rear
(!) and over the front
Frame rail. This means that the batteries are as big as before but they are the
other way around making room for the fat tyres and inboard motors.
This will of
course have a door so battery swapping takes seconds. All my batteries already
have a wiring loom attached and they just plug in. I have a LOT of different
batteries! I test them so you don't have to! Please excuse the crappy weld
on the left! The original paint made it not go quite right. Well it might not
look pretty but its strong... And all of this will get a thick layer of powder
coating once everything has been fitted together to test. Just like the other
chair here
The bottom
Upside down again showing the front. One part has been left longer to allow the
seat support to bolt on. Needs a hole drilling 8mm yet. And the whole part
then needs a mounting welding to it so that the vans wheelchair clamp can safely
"grab" my van. I may also add a strengthening piece to the front plate as this
is all that stops the batteries from continuing forwards in the event of a
vehicle crash. As it is I suspect it would be strong enough but we will see.
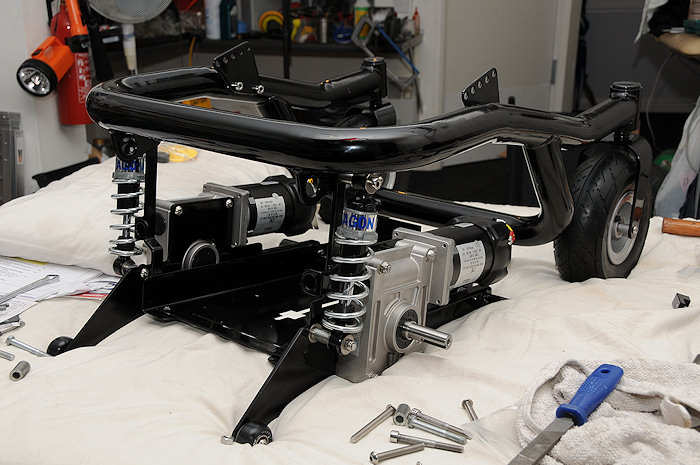
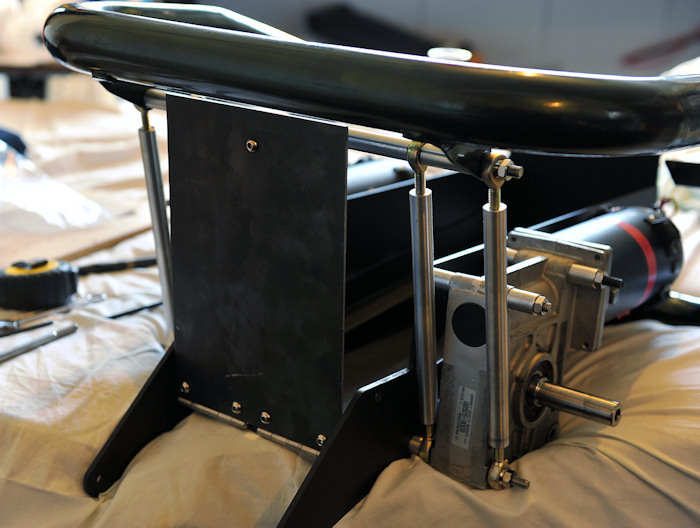
Ok here it is bolted to the frame... With a motor in position.
Bigger size
|
Really big image!
powerchair medium
|
powerchair
large
Ok here it is bolted to the main frame. And it has a motor bolted on, with all
the wrong bolts and spacers in temporary fashion. Ignore the spacers and bolts that are
sticking inside where the battery needs to be -- the bolts were a bit long! And
the wheel is just propped in place in the shaft since I am waiting for the
machine shop to return my new mountings designed again on a beer mat!
Now
you see how it all will go together. Direct drive motors inside the wheel would
have been slimmer and no need for the new centre section but where is the fun in
that?
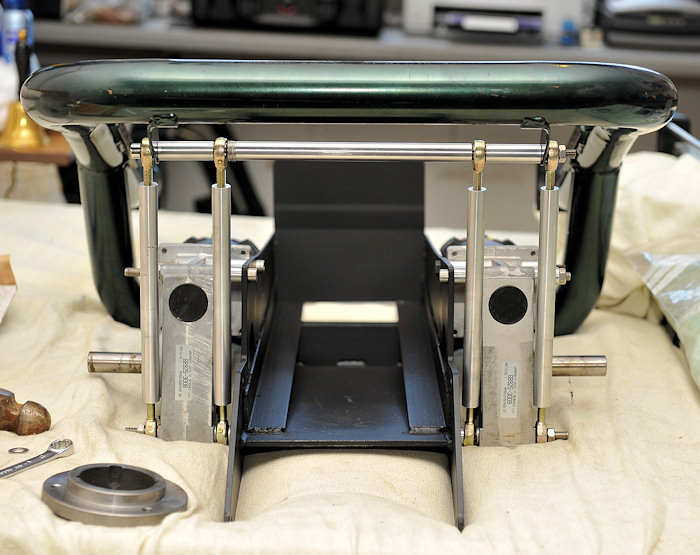
Right. Now I have machined some 16mm alloy bars to support the rear end/battery
tray/motors. It is easy to buy these 8mm Rose Joints, Rod ends, Spherical
bearings or whatever they are called for about 2 pounds each on the Bay of E. I
buy them by the box as you can see...
Remember that this is all a trial fit to find all the right spacer, rod lengths
etc. Which is why the horizontal one currently has a stack of washers! And to
measure up for the correct polished stainless steel domed headed bolts. All
these alloy bars, battery tray, and frame will be shot blasted and then powder
coated and it wont look all rough like this on final assembly. And new 4
pole motors with the tallest gearing available. Fast is good.
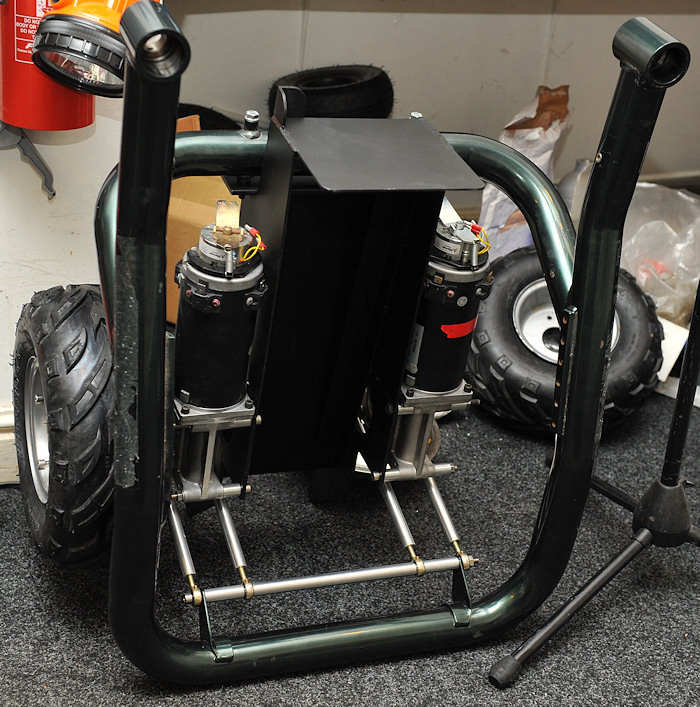
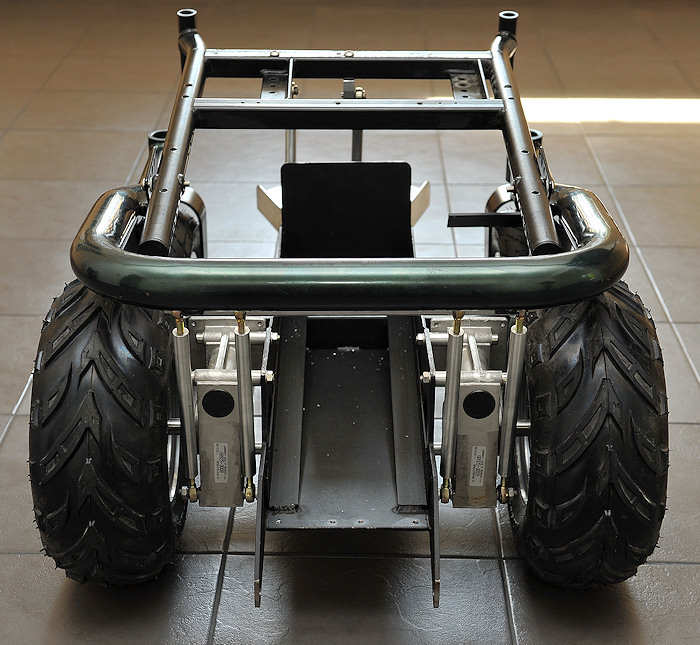
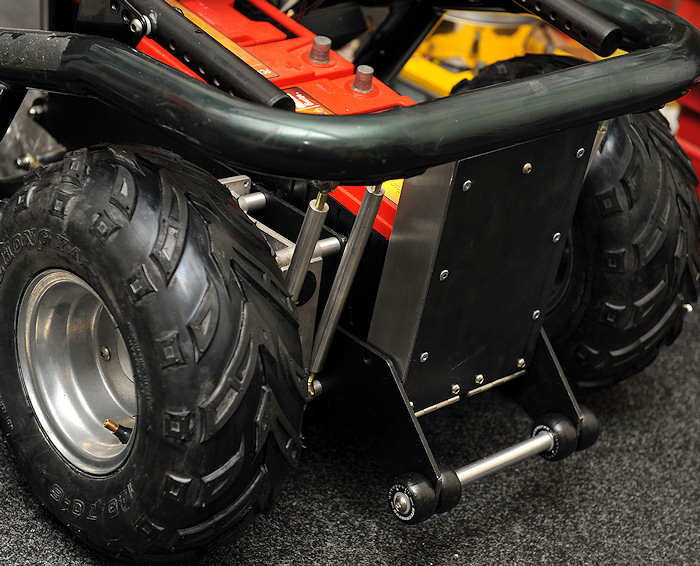
Another rear view so you can see how it goes together. The reason for 4
alloy upright bars is to make damned sure that the very outboard wheels don't
bend the motor mountings inwards in heavy use like when leaping off curbs...
Stops them twisting.
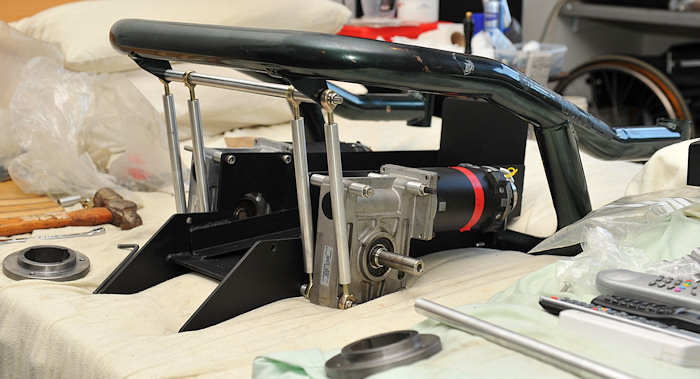
Here you can see how the main frame is attached. The weight is transferred
directly to the motors (actually the gearboxes) rather than the battery tray.
And here you can see how well the wide wheels and tyres now tuck under the
frame. Its actually NARROWER than a stock powerchair whilst still allowing the
use of group 24, 75 Amp Hour batteries...
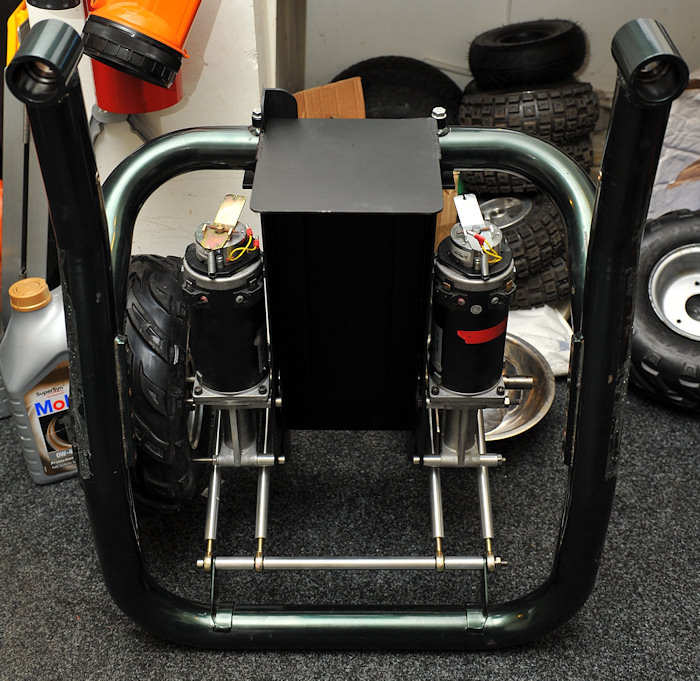
Here is another View.
battery door
medium
|
battery door
large
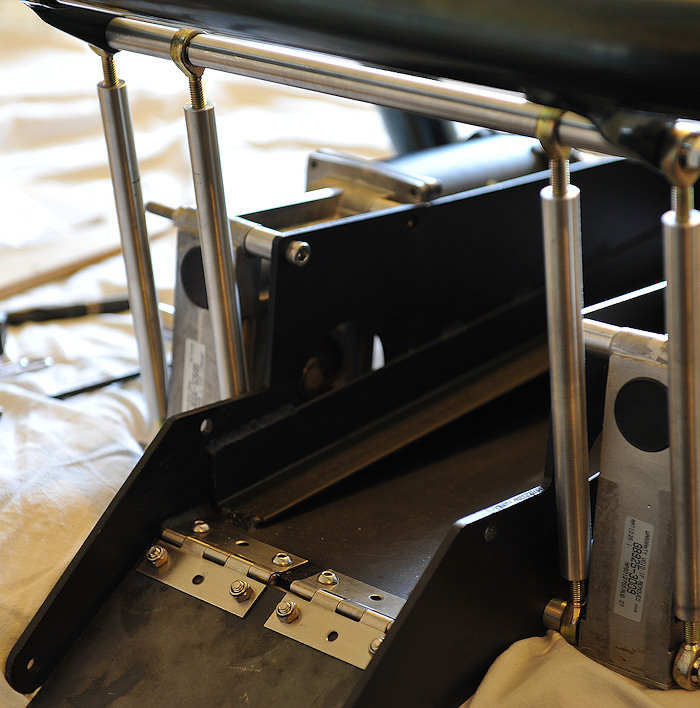
It needs a battery door. Not an elegant solution but strong and easy to
implement in a home workshop -- Stainless Steel door hinges bolted on with 6mm
stainless steel bolts and nuts! the door itself is just 3mm steel plate.
eventually it will be powder coated and pretty of course. Now its easy to load
and unload batteries as you just open the door and slide them in or out.
Battery door closed.
battery door medium
|
battery door
large
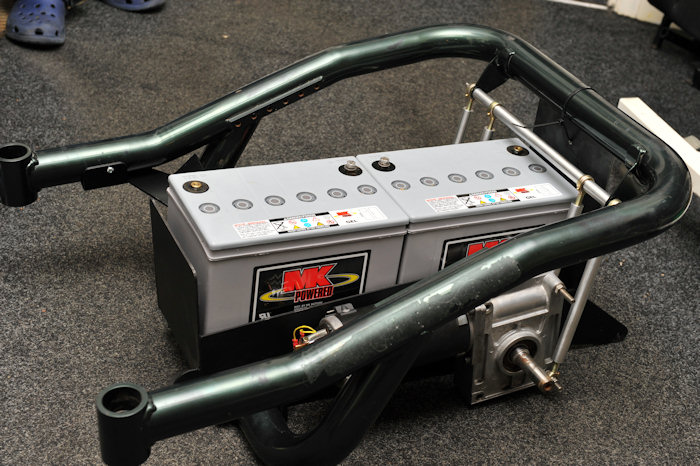
And with some big full size (MK) Group 24, 73ah batteries in place to check they
fit well. They should unless my ruler is broken... Not all batteries
are EXACTLY the same size though. My new home built battery tray thingy allows
batteries that are 175mm wide, 225mm high and 270mm long maximum.
Fortunately that means lots of choice of the type and size (capacity) of
batteries that I prefer. These MK batteries were free to test (thanks!) but they wouldn't be my
first choice!
I am using them here only to check that they fit in the space. They cannot make
the currents I need without voltage drop being a problem. So much so that
wheelies and even hard acceleration make the joystick lights go dim and power is
lacking. All Gel batteries do this at a good solid 100 amps per channel. (both
motors) For most peoples needs these MK's are as good as it gets though as
they just don't need this power. Personally I will use AGM batteries. They are
way better at fast energy release but don't do as many "cycles". Hawker Odyssey
or Optima in are my choice this case.
See:
Inverters and Chargers &
All about Powerchair and vehicle batteries and
Which
batteries to buy and
http://www.wheelchairdriver.com/powerchair-batteries.htm

off/on road powerchair
larger view
Rear view.
Trust me it will look as good if not better than this one does once its all been
fully built, then totally stripped apart and all the bits sent off to the powder
coaters.
wheelchair wheel adapter
medium
|
wheelchair wheel adapter
large
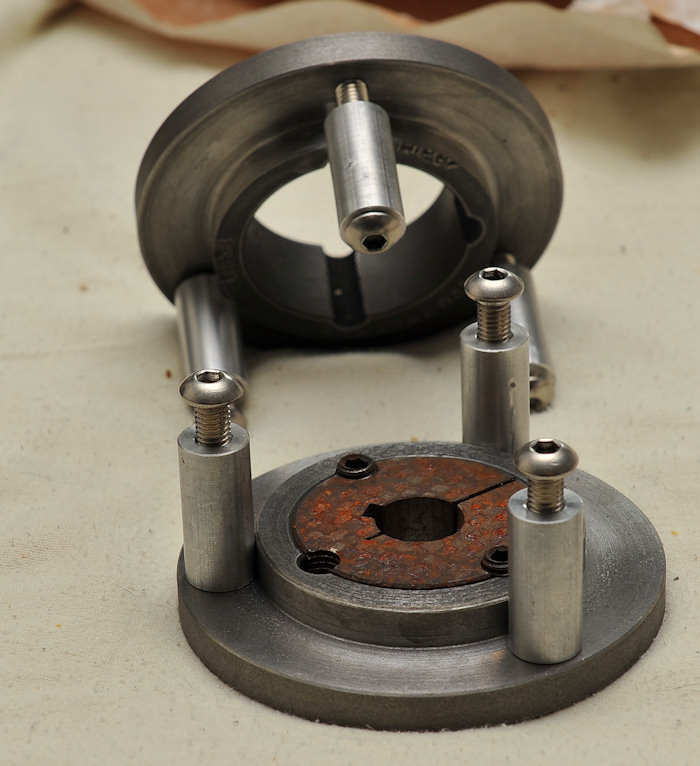
Wheel mounting plates/adapters and spacers. All made from old pulleys... Don't
worry it will all look better than new eventually when powder coated and
reassembled after this trial build.
fat tyre wheelchair
medium
|
fat tyre
wheelchair
large
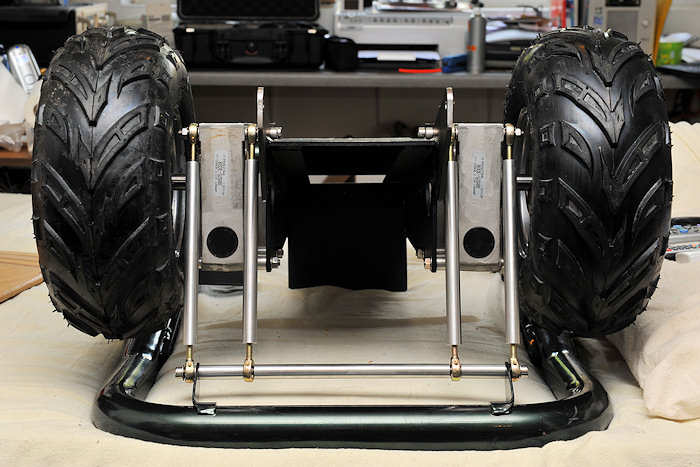
Wheels fitted on those adapters. Motors removed temporarily for weight reasons.
This looks wide.
But its actually the same as a stock F55s powerchair at
just under 26
inches... Its a delusion!
I will get a softer ride if it kills me. The standard
thin tyres with "shock absorber suspension" simply didn't! Its all in the bin
now... Saved the weight of those swinging arms, the shock absorbers etc. This is just as compact,
narrow, "floats" over soft ground like sand and the huge
sidewalls and 7 to 10 psi tyre pressures give a very soft ride. And of course being 4 ply
and tubeless all but puncture proof. So we ill get the same full range, full
power as a full size powerchair but with the compact measurements of a small
indoor only powerchair and with big fat fun tyres! I love it when a plan comes
together.
wheelchair kitchen
medium
|
wheelchair kitchen
large
How it will sit. Notice the shoes on Brian's feet...
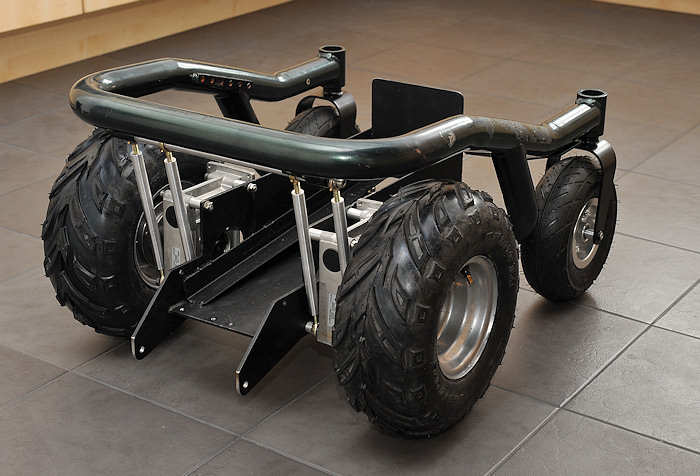
off road style powerchair
medium
|
off road style powerchair
large
Well that's all the basic engineering done at the rear
end. It all just awaits stripping down, shot blasting, powder
coating and re assembly.
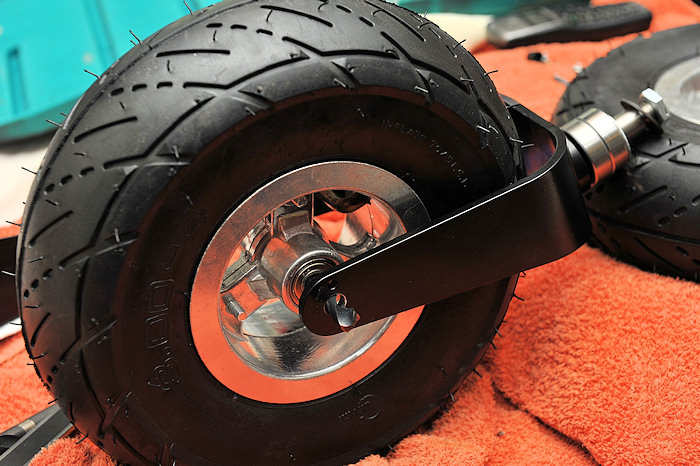
Caster fork being drilled
medium |
caster fork being drilled
large
Now the new front casters
and new eBay front wheels. The new wheels have 10mm diameter
shaft/bearings. The original ones that were in the original "expensive and weak" wheels
were 12mm with a 12mm shaft. It located up to the caster fork and had a nasty
8mm bolt that held it in place. They work loose and so a tab washer had to be
included. I just drilled the new caster fork out so that a 10mm new stainless steel axle
can slide completely through the fork, the spacers (alloy, 16mm bar, 16.4mm long and bored
out 10mm and currently being made) and the bearings in the wheel. Actually the
bearings will be stainless steel ones on final assembly as stock ones corrode,
and drag in hair as they rotate. This lets water and road crud in and they
corrode on the inside too...
Now just to make the spindle for the front wheels and
get them fitted below...
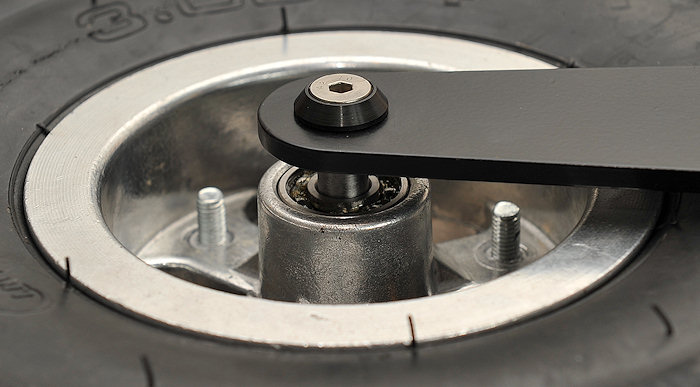
special
washer
medium
|
special
washer
large
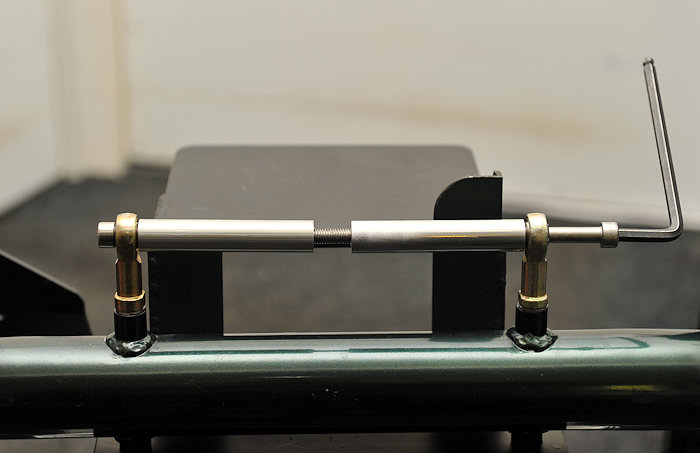
OK. New 10mm diameter axle made.. Simply by using 10mm bar cut to length (107mm
to be exact!) and drilled and tapped M6 on the ends. It goes straight through
the castor fork, wheel, spacers and everything. It is held in place by two
special alloy anodised black washers and two M6 countersunk screws as shown.
Looks neater than stock (a rust prone M8 hex Bolt & tab washer!) and is stronger
since the thread takes no loading because the axle fits accurately inside the
fork leg. So it wont come loose and needs no tab washer... Who designs these
things?
Ignore the bearing. Its there just for measuring purposes. A stainless
steel sealed one (4) will be fitted as stock ones rust and fail. Again
since Stainless steel ball races are no dearer to buy why do they fit steel ones
in this situation? God knows.
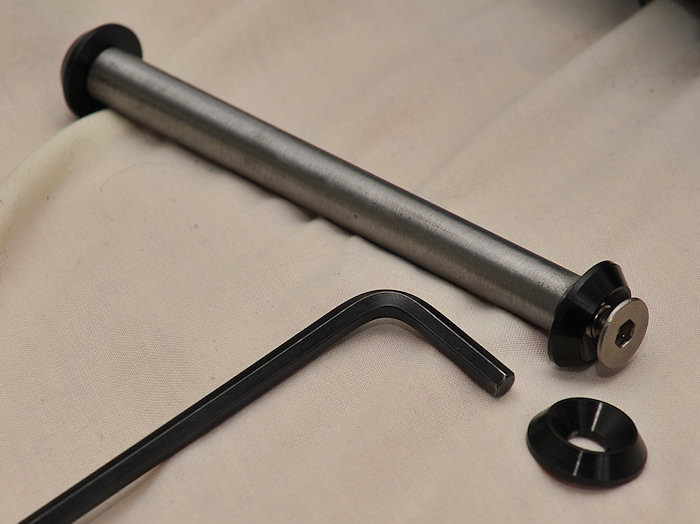
Axle = 10mm stainless steel bar with tapped M6 ends, some fancy alloy eBay
washers, (available in many colours and sizes) and some countersunk (to be
polished) stainless bolts... Not too hard! AND IT WONT RUST or sieze...
Now the spacers. These are 10mm bore (10.4 actually to allow some clearance) and
17.00 mm long... Made from 16mm bar alloy. Instead of steel as per original. These too will be powder coated...
Eventually. My Olde trusty Myford lathe is very useful. 4 needed
obviously...
Cool off
road electric wheelchair
medium
|
Cool off road
electric wheelchair
large
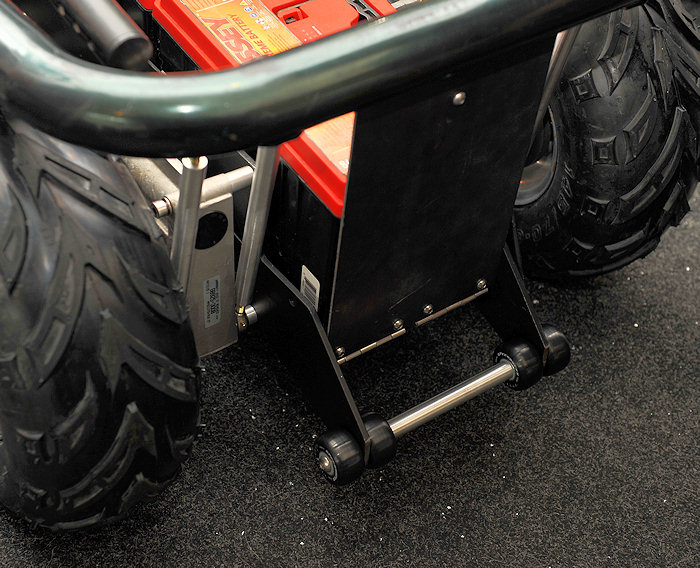
Heres how it looks at the moment. The anti
tip bars have been shortened. It means I can reverse even further back to the
wall and they will not hit anything behind me when manoeuvring. This further
helps this powerchairs agility indoors. It was already shorter than my manual
chair before cutting 2 inches off...
They will be fitted with 44mm skateboard wheels and stainless steel bearings
eventually. They will allow a slightly higher tip angle than stock setup. That's
good! I sit balanced on those wheels in the pub... They are also further
inboard by 4 inches compared to a stock powerchair on each each side. Further
keeping them out of the way. When it comes to all day powerchairs every inch (or
even less) makes a huge difference. I wish the manufacturers would
realise that. They seem to add weight and inches everywhere willy nilly for no
good reason. Oh and the front wheels/casters are fitted so I can see that they
clear the new centre section/battery tray etc.
I have removed masses of metal, brackets, extended "bits", and other overweight
rust prone bits during this build. I have half a room full of oversized
overweight parts that are just better removed. E.g. have you ever used
indicators in a powerchair? How daft - they both get in the way, look crap and
weigh a ton at the same time. Weight MATTERS. It effects range, battery
longevity (due to average discharge cycle depth) as well as performance.
The original front casters, wheels and bearings and axle (shown fitted here)
alone weigh a ton! The new wheels are much lighter with smaller bearings
and shaft too as well as being almost free at 20 up pounds for 4 complete wheels
and tyres! But the caster forks themselves are still very heavy and still prone
to bending if you wheelie a lot... They should be alloy and a better design that
can stand side loads when you land and they are pointing the wrong way. I am
looking at making some lighter stronger ones once this chair is done from carbon
fibre and a friend with an autoclave..

Wheel centre disks fitted. These are turned
and countersunk in the centre for a countersunk stainless steel cap screw. But I
have non here yet so its got the wrong bolt in. Both it and the wheel will be
shot blasted and powder coated eventually after the trial build before final
assembly.

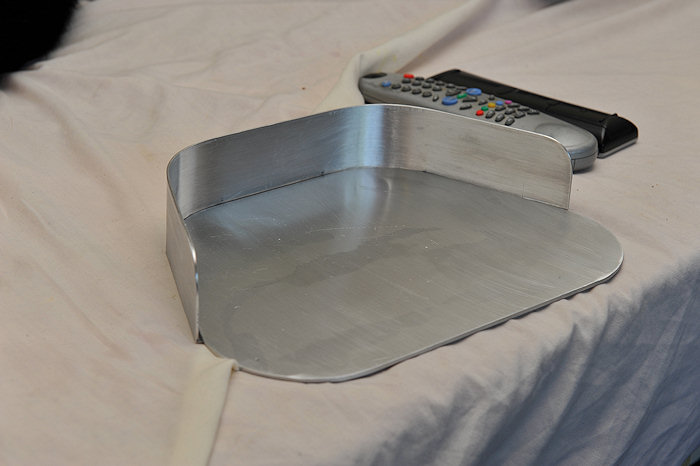
New footplate parts. Pretty self
explanatory. The footplate is 3mm alloy sheet. Cut out with a jig saw and a file
to clean it up. The bit that goes around the back was a limp of 2 inch aluminium
angle strip just cut out with a saw and a file. When marking out I just drew
around a pair of size 12 shoes and used CDs for the rounded corners. Nothing
very high tech...
Together

Underneath, taped up ready to drill for six rivets! Then like all the rest it
will be assembled, tested, then dismantled and sent for blasting and powder
coating.

Here's the actual footplate cut from 3mm
alloy sheet. Its actually the same depth (side to side in this picture) as a
sheet of A4 paper. Mostly because I designed it by sticking a pair of my shoes
on a page and drawing around the heels! So you should be able to draw your own
from this pattern.
Bigger
view
The paper sat on it is my plan for the
footplate mounting shown below. Its as good as most of my engineering
drawings. So you should be able to copy this if you prefer this type of
footplate to those awful "swing away" ones that this chair has as standard. This
is the latest incarnation! The long Allen bolt that you will need is M8 X
140mm. Not easy to get locally but orderable online.

Wheelchair is facing up and we are looking at the bottom. This is how the new
footplate attaches. The two gold coloured bits are Rose Joints (roast joints
according to my carer Jenny). They are important. The whole rear of the
wheelchair attaches by two M8 bolts from the bottom, and they screw into the
rose joints which serve as nuts. Why rose joints? �1.60 each on eBay...
And because we need the complete footplate to hinge up and down with the seat so
my legs can stay the same length. And because they are strong! This shows
the long bolt going straight through the alloy bar since its drilled 8.3mm down
the middle.
This shows the same bolt screwed into the alloy bar on the left. As is the short
30mm bolt on the left.

And this shows a 20mm square bar fitted into the gap! It obviously is also
drilled 8.3mm so as to make this possible! Now it just needs cutting to length
and have the footplate bolted on to it. Then as per usual it will all come apart
and be powder coated and sent back for final assembly.

footplate solution
medium
|
footplate solution
large
Seat frame fitted. Still to have the front bits that
stick out cut off. They were for those pre historic looking "swing
away" ones that the standard wheelchair comes with. Awful things, look terrible,
get in the way when transferring, weak and add "corners" preventing
manoeuvrability in tight areas. And the footplate is riveted together and
fitted. Note all the rose joints and more 16mm bar used again. Good job
they are cheap on eBay!
The roast Joints (copyright Jenny) allow the seat frame to tilt (if I decide to fit an
actuator) and the footplate follows. Everything is corrosion proof neat well
engineered and strong. And amazingly light compared to the huge pile of old iron
parts that is piling up as I throw away all the cheaply made badly engineered
bits from the original powerchair...

footplate powerchair
front medium | footplate
powerchair front large
The other side. Try to ignore the tyre
fitted backwards... You can see that the footplate is hinged up and down
on rose joints (spherical bearings, rod ends or whatever you call them) and the
seat position is fixed by the one that is on the right of this image.
powerchair
rear view medium |
powerchair rear
view large
The rear end. It will get its battery door
eventually! And a seat back.

powerchair rear quarter view
medium | powerchair rear quarter view
large
Rear quarter We are slowly getting there.
Like British Rail. Only they never did. I will not be fitting the seat back, the
rear door, the batteries, or the various control pods/power modules yet since
this is just a fabricate/trial build and I now know everything I need to send
all the bits you see here along with many that you cant both old, fabricated and
new to be blasted, and then powder coated..
So the basic modifications are done. Now all that remains is to re assemble it
with care and a tub of grease and polish all those stainless steel bolts.
Reassembly but better than new as per the other
powerchairs over here. I wont repeat many
of the build detail here as they are on this page too.
which you really need to read first since this new page follows on from it..

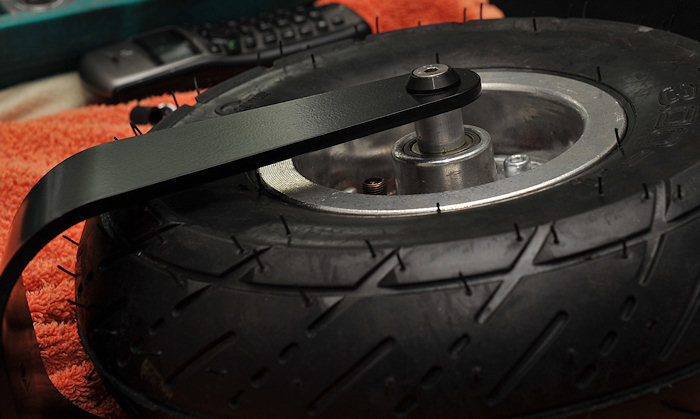
Skate Wheels
medium | Skate Wheels
large
Trial fitted to a dirty tatty but mechanically
completed powerchair. Now as you can see I have fitted small ones.
They allow for a tip angle of about 40 degrees. I like wheelies and do them all
the time like a loony... It will all look cool once powder coated and
rebuilt is about a week.
I fitted four because I have fell out of the back several times when they sink
into softer ground! So with the 4 wheels and the bar going right across its hard
to see how than can still happen. We will see! Bigger wheels would help here and
its what the safety Nazi manufacturers would do.
But I refuse to lose any manoeuvrability.. My way is better. Remember they are
shortened by 2.5 inches as well. Much better than sodding great castors sticking
out like mid drive chairs! And it reminds me of my drag racing days!

Battery door finished. Now rigid, strong and light. Hinges are stainless steel,
not too elegant but very functional! Batteries slide down the chute. All
carefully planned so that the door closes inside the battery tray area.
Battery door
medium |
Battery door big
Like this. The middle top bolt holds it
closed. And the batteries in. Easy swap batteries...
|
|
These are good examples of how extreme I am when rebuilding properly! They are just Skateboard
Wheels.
I use these to replace the horrid grey rubber ones that have no bearings
with these. The ones I use in all of my powerchairs. They are available in all
kinds of sizes.
Off road the bigger 70mm black and yellow ones are better. On road where they
will not "sink" in soft ground the smaller black ones allow higher wheelies and
even allow me to sit in the pub balanced on these and the main wheels while I
have a beer. They are available wider if you prefer for off road use too.
Or you
can fit four rather than two by using a longer bolt. All skate/board/inline
skates use the same sized bearings. All have an 8mm hole in the centre for an M8
bolt. The same as your wheelchair! So buy 22 x 8 bearings to go with them. All
available from eBay...
The bearings are of course Stainless Steel As you know by now I don't do
corrosion and rust! They are the same price almost anyway... Why don't the
manufacturers do this? Don't know.
They last longer! The black ones are hard.
The yellow ones are soft urethane. Many different ones available. The stock
rubber ones last about a week if you wheelie all over the place.
More to come tomorrow. 9 May 09...
Actually there is no more for a few days. On Tuesday it
will be disassembled and all bits shipped to the Powder coater.
They will be
cleaned in acid and blasted. Then ALL parts will be powder coated.
No
manufacturers thin layer of semi gloss paint here! We want complete easy to
clean long lasting corrosion proof good looks years from now.
All the salt and
road crap should be able to be washed off and the powerchair look as if its just
been built. Standard ones don't do that! They look wrecked after a year.
|
The next section will be added when we start to
assemble everything again. Burgerman. In the meantime:

Cant decide if I should fit Optima or
Odyssey batteries. Both are equally good. Both are the same price.
Both are capable of starting a truck so no issues with lack of current like I
always have with all Gel batteries. Still not sure. Both do 400 cycles or
so at 80 percent depth of discharge. The odyssey is heavier, bigger and has
slightly greater capacity. Both outperform Gel batteries when I use them by
miles. Maybe I will get one of each! (Joke)...
Either way these ones are dead (Jim) and non too healthy.
(Part
1
| 2
|
3)
That's all the fabricating and modifications
all done. Now to send all the parts
away to be powder coated and rebuild it!
Added a footnote:
Just been looking at how much of this powerchair is
actually modified, fabricated and original.
These chairs of mine evolved slowly over ten
years of adaptation and improvement as I fought to fix bad design and bad finish
etc. I just realised how much is changed after looking at yet another cheap eBay
chair in my garage...
Original stuff:
-
Main frame (although
powder coated) I could design better for my needs but not in a bedroom!
-
Front casters powder
coated as the original paint is dull and thin. But using
my lighter better wheels on my axles and bearings in (stainless steel) Did I
mention I hate corrosion and failure?
-
Seat frame/upholstery.
Although mounted further back on my fabricated mounting plates and supported
at the front with alloy bar and rose joints. And the front mountings for the
swing away footrests cut off. And again its WAY too heavy! And the arms fail
every few months and go all loose and rattly where they mount... Arm side
plates replaced by lighter better bars And powder coated. At some
point I will have to replace this with my own lighter alloy more simple and
elegant longer lasting design since it annoys me.
-
Motors (6mph 4 pole)
As fitted to the latest Sunrise F55s with the Cush Drives replaced with a
metal strip as they fail. They are
big heavy and non too efficient! I would really love to replace them
with brushless gearless ones and may well do so soon as I am looking at some
now...
Fabricated / replaced stuff:
-
Bolts / fasteners -
Every last one! Replaced with Stainless polished cap screws or Allen
bolts. They look good and do not seize or corrode... Since powerchairs
cost as much as a small car why are they finished like a Chinese bicycle?
-
Swing away footrests. Too big, too far forwards, and they
make your chair have corners! And transferring is hard as they are in the
way. I made a better lighter smaller stronger single one that helps
manoeuvrability.
-
Seat mounting plates.
Fabricated because the whole powerchair is way too nose
heavy! So I moved the seat back about 3 inches.
-
Kerb climber - heavy and
pointless. I can now do bigger curbs just by popping the front wheels up
with the C of G corrected and better programming etc.
-
All kinds of iron bracketry,
A big box of heavy un needed bits, everything from spacers to brackets that
hold brackets. All over weight and not needed.
-
Plastic fake carbon battery covers - binned
-
Battery box - no longer needed
-
Rear suspension swinging arms - Binned not required with fat
balloon tyres
-
Rear suspension units -
to stiff and too heavy and too short travel. Binned
not required with fat soggy low pressure balloon tyres
-
Lights - heavy steel and
glass things! - Binned non needed. Kept the rear ones because I don't want
to get killed on the way home from the pub...White reflectors are all I need
on the front. Not strictly legal but who cares.
-
Main 80 amp power controller
- Stored replaced by reprogrammed 100 amp unit.
-
Full power / Lighting actuator -
Stored... Legally required
on a 6mph+ chair (road legal!), as it works the lights. But ridiculous all
the same just more weight and wires etc. Lighter is better.
-
Rear wheels and tyres/tubes. Replaced by less puncture prone
smoother riding tubeless off road "quad" tyres.
-
Front wheels - replaced by lighter prettier cheaper eBay
wheels in the same size (4 inch diameter,3 inch wide rims
-
Wheel and Caster bearings - replaced with stainless steel
ones since they fail due to hair/corrosion.
-
main frame/centre section,
battery and motor mounting replaced with my own narrowed one piece unit.
-
Anti tip wheels -
replaced by harder wearing smaller skate wheels with stainless bearings as
long wheelies wear them out fast. And they sound better!
-
Batteries. Gel batteries
can't cope with the currents required with tall gearing, 100 amps and above
controllers and my weight! Replaced by top of line AGM batteries.
-
Plenty more but I'm bored now...
Seems not much of the original left! How did that happen?
And the following is just some cheap junk bought off eBay.
 The
rear tyres above NEED grip off road. Especially on sand or wet grass etc.
(Update - And snow! Couldn't get to the pub last night...) So a tread
pattern like this one opposite on the drive wheels is a good idea. The drive
wheels control where you go
and drive you along. You COULD also fit these tyres opposite (and the wheels
should you wish) to your stock powerchair - they are the correct size to fit
straight on to the front castors. The
rear tyres above NEED grip off road. Especially on sand or wet grass etc.
(Update - And snow! Couldn't get to the pub last night...) So a tread
pattern like this one opposite on the drive wheels is a good idea. The drive
wheels control where you go
and drive you along. You COULD also fit these tyres opposite (and the wheels
should you wish) to your stock powerchair - they are the correct size to fit
straight on to the front castors.
They are
an "off road" tread pattern, designed for grip and they match the style of the
new fat rear ones. But you
wouldn't be too bright if you did! Only people that don't quite understand
real powerchair dynamics or even basic physics would see this as a good idea...
The reason? The front casters job is to go wherever the rear wheels steer the
powerchair. And the easier they turn around on the spot or move the better. For this reason grip is the very last thing you want here!
The less there is under any circumstances the better. On
carpet, grass, sand, or tarmac. So even on a powerchair that will be taken off
road its always better to fit the smoothest and most rounded profile tyres you
can find. So they have as little grip as possible. Like the stock ones...
HERE
Anything else is just style over function and makes no sense at all.
I bought 4 similar to the above eBay image myself. Not
to use the tyres but to use the wheels as they are lighter and better
designed and look prettier than overpriced powerchair ones. And they are the
exact same size. That is 4 inch diameter rims x 3 inches wide.
The whole package below was 20 UK Pounds for 4x wheels
and tyres on eBay. It includes 4 tyres (to be re sold on eBay) 4
wheels with bearings and spacers and four inner tubes! The tubes alone
cost that much from a mobility dealer! See below:

So for reasons of better more functional manoeuvrability I will not be fitting these
3.00 x 4 tyres to the
front!
I only bought these eBay ones just for the wheels and will be eBaying the tyres...
Or it will just suck more amps and make turning more difficult while
ripping up carpets and grass and defeating the object of a free moving caster at the
front! I will fit these tyres
HERE
(Added, I already have fitted just the wheels! Make me an offer for the
tyres?)
In the meantime here's Vera again looking confused by her phone

Fit Fit bird with phone (Large) |
Fit bird with phone (Larger)

This is Brian. (Brain) he does all the stuff I cant. Long suffering because I am
a perfectionist and he does everything twice... And is getting very good at
building powerchairs at the moment.
(Part
1
| 2
|
3)
That's all the fabricating and modifications
all done. Now to send all the parts
away to be powder coated and rebuild it!
Detailed PowerChair Only Menu
Lithium Ion Batteries for
Powerchairs and Scooters
|
